In this section, we will take an in-depth look at Google's indexing infrastructure Caffeine. From Inverted Indexing and Vectorisation to Index Bloat and Index Management, you will master how Google indexes the Internet.
With millions of queries being matched to billions of web pages, search engines like Google need a solution to store and retrieve this information in a way that is both scalable and efficient.
Fun fact: Over time, Google has indexed more than 100,000,000 Gigabytes of information and have spent more than 1 million computing hours building their index!
Caffeine: Google’s Indexing Infrastructure
On August 10, 2009, Google announced Caffeine – an update that has become one of their most important to date.
Caffeine was a new system to help Google crawl and index data more efficiently. This meant that Google was not only able to continue to build its index, but also provide fresher results in the SERPs.

Before the days of Caffeine, Googlebot would crawl a collection of pages and process (storing key content tags and attributes such as <title> and alt attributes) them in batches before adding them to the index.
The problem with this, is that the entire batch needed to be processed before it was pushed live.
With Caffeine, Google is able to crawl a page, process it through the entire indexing pipeline, and push it almost instantly. This means that once pages have been crawled, they are made available to searchers much faster..
But how exactly is this done?
Inverted Indexing
Google uses a patented version of an inverted index system to organise and store a version of each of the pages Googlebot discovers. The system involves two key components, a database containing text elements, and numerical pointers to the respective documents which mention these text phrases.
Google processes search queries using tokenization to reduce the words to their core (or binary) meaning and adding a reference (or token) to the search index. These tokens serve as keys within the index.
Tokenization – the process of classifying a string of text into its most basic components. For example, breaking the sentence “SEO is great” into its distinct terms “SEO”, “is” and “great”.
During this process, common words like “and”, “to”, “the” (also known as stopwords) are discarded as they do not convey any topical relevance. Tokenizing the words reduces the amount of memory needed to store the pages, but also means retrieving pages is much faster when a search query is placed.
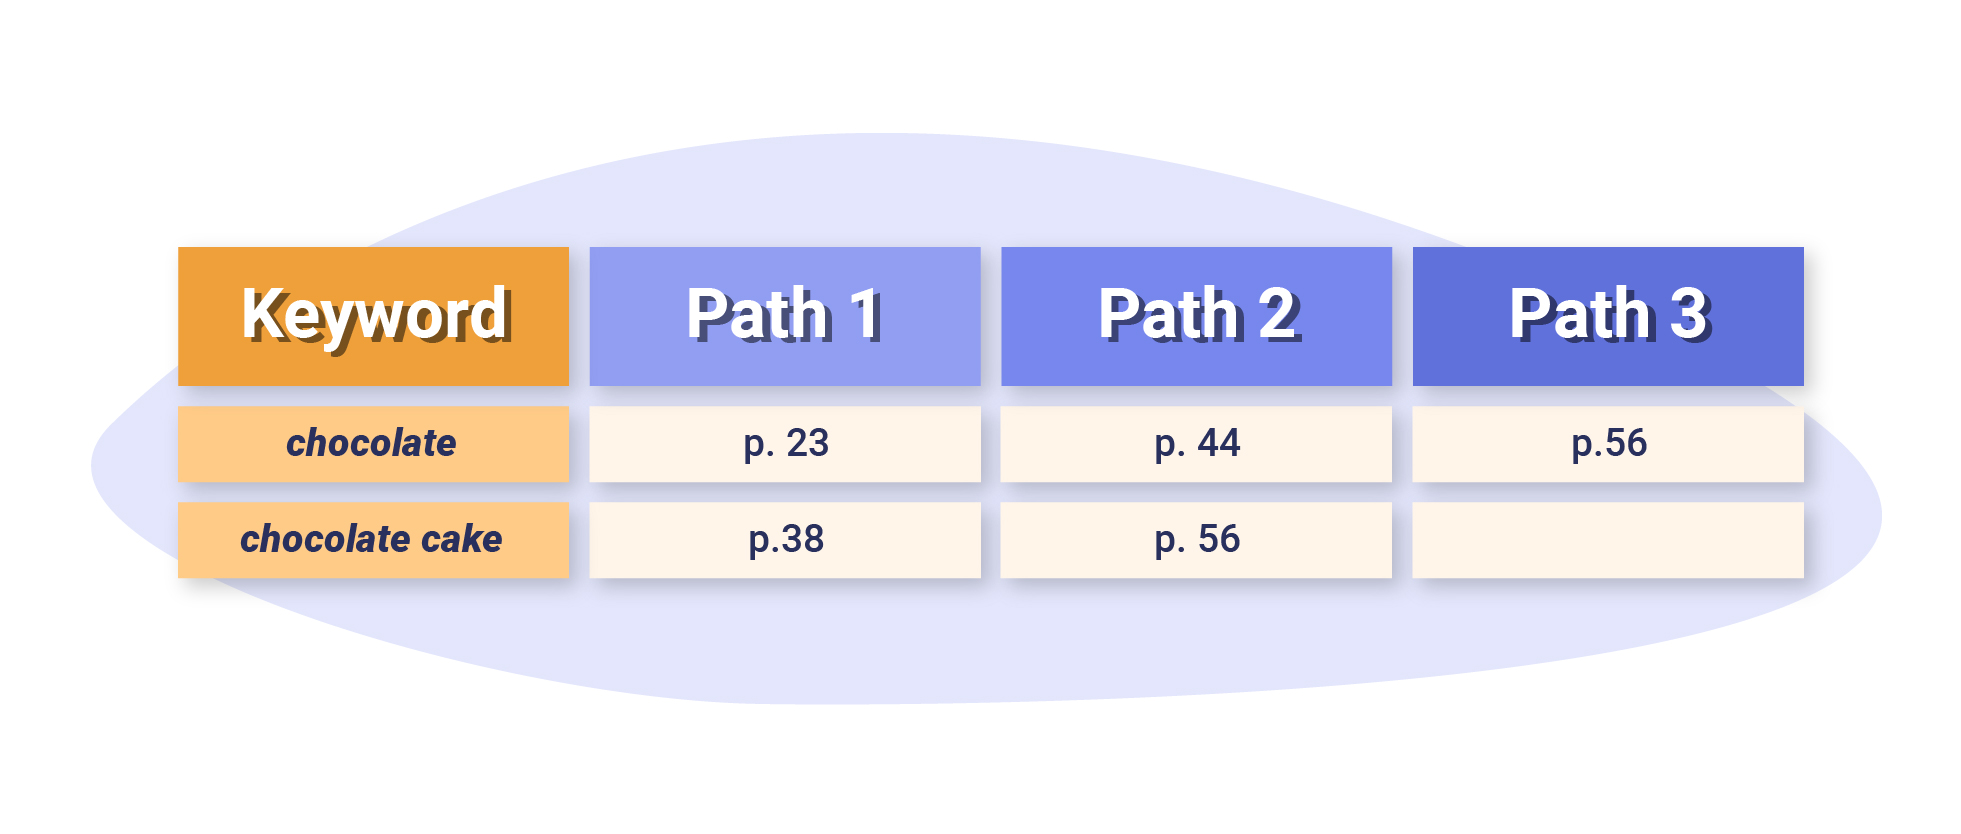
Analogy of Inverted Indexing
An inverted index is akin to an index you would find at the end of a recipe book. Keywords like “chocolate” and “chocolate cake” (tokens) are associated with recipes (documents) where they can be found.
Vectorisation
We now know that Google tokenizes content from web pages to create references between them and the user’s search queries. But how exactly is this done? The answer: vectors!
If we arrange all of the documents as row vectors in a matrix, the columns become inverted lists where each keyword contains pointers to a list of all occurences of the term, in all of the documents that have been crawled and indexed.
In the simple example below, we have a collection of documents (a web page) that contain terms (keywords).
The terms serve as the indexing units (heads of our list) where we will store the occurence of each of these in the documents – in terms of SEO, this is the equivalent of keeping track of keyword occurrences within a web page.
Documents
- I love to eat chocolate and I love to eat cake.
- I love to eat chocolate and cake.
- I love chocolate cake.
- I love to eat chocolate cake and I love to drink milkshakes.
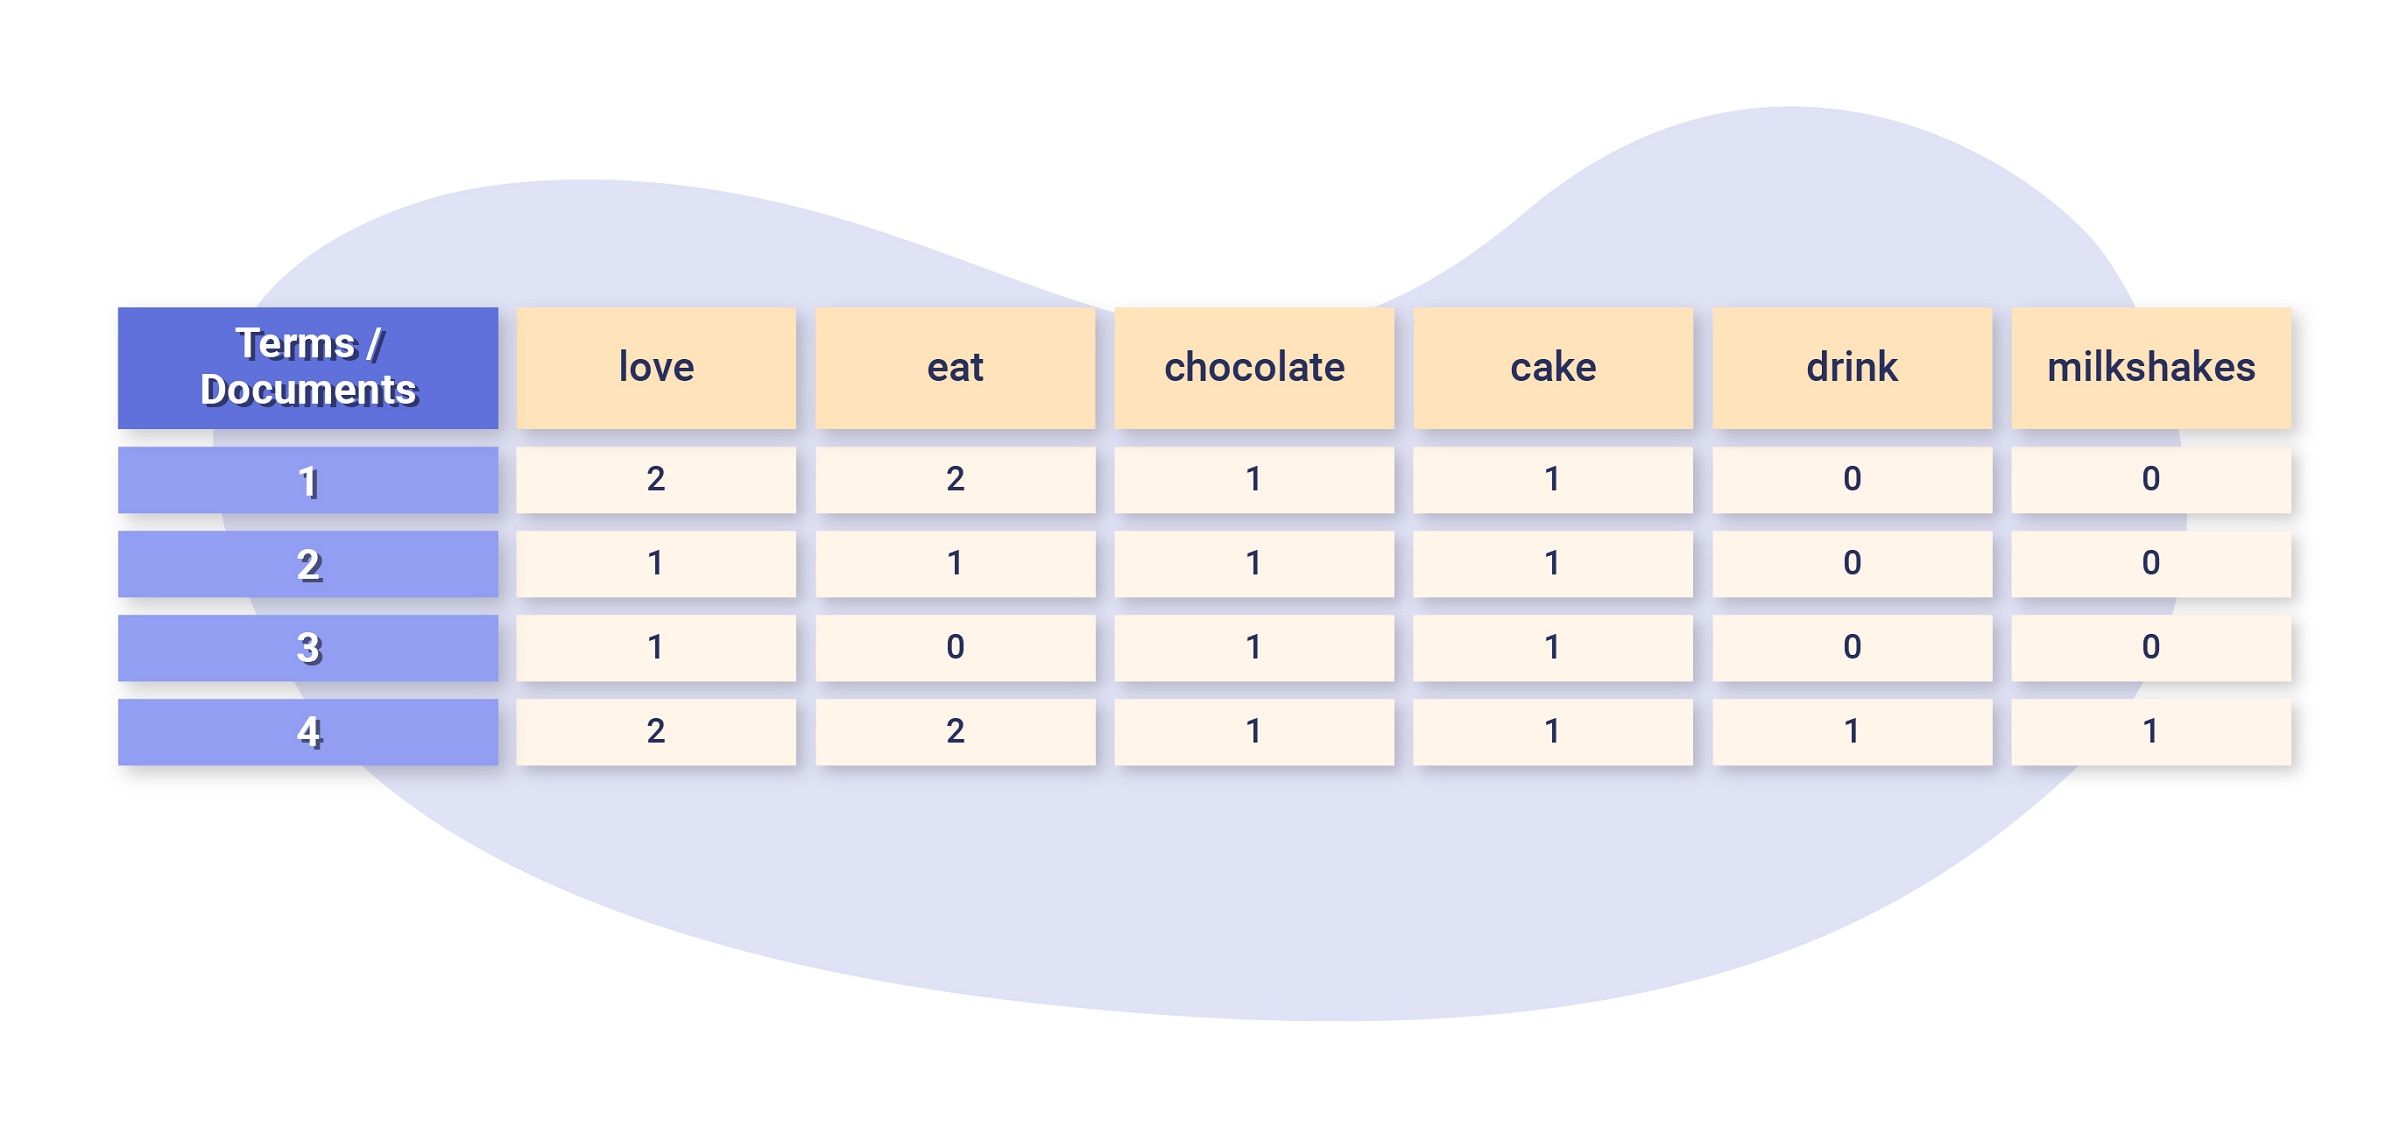
If we treat each document as a vector, the collection of documents becomes a matrix.
The inverted list is a transposition of the matrix, which means that we’re looking at the columns as opposed to the rows of the matrix.
The transposition of a matrix is its inverse – flip the rows to columns and the columns to rows.
In our case, the columns represent the number of times the terms appear within each document.
So, if Google wanted to look at keyword density, it could look at the inverted list for a particular keyword and retrieve the documents (web pages) with the most occurrences of this keyword.
Keyword density – how often a keyword appears within a web page.
Whilst the above example is great for illustrative purposes, Google’s vectorisation process is far more elaborate.
Word2Vec
Google’s Thomas Mikolov and his team developed Word2Vec (aka Word Vector), an AI-driven neural network that uses machine learning to understand the sentiment behind keywords but also how they relate to each other.
Word2Vec takes a text corpus as an input, and outputs a representation of the words within that corpus as a neural word embedding.
Corpus – a large and structured set of texts – in the context of SEO, this could be the content that appears on a web page.
A neural word embedding is the representation of a word as a numerical vector.
Word2Vec enables you to analyse, measure and compare words, find similarities for a particular word or phrase, add/subtract words from each other to find other unexplored results and also to see the relationships between words within a document.
In short, it’s all about trying to find the meaning behind words and how they relate to one another. It’s easy enough for humans to find the commonality between two words, but how is this encoded by machines?
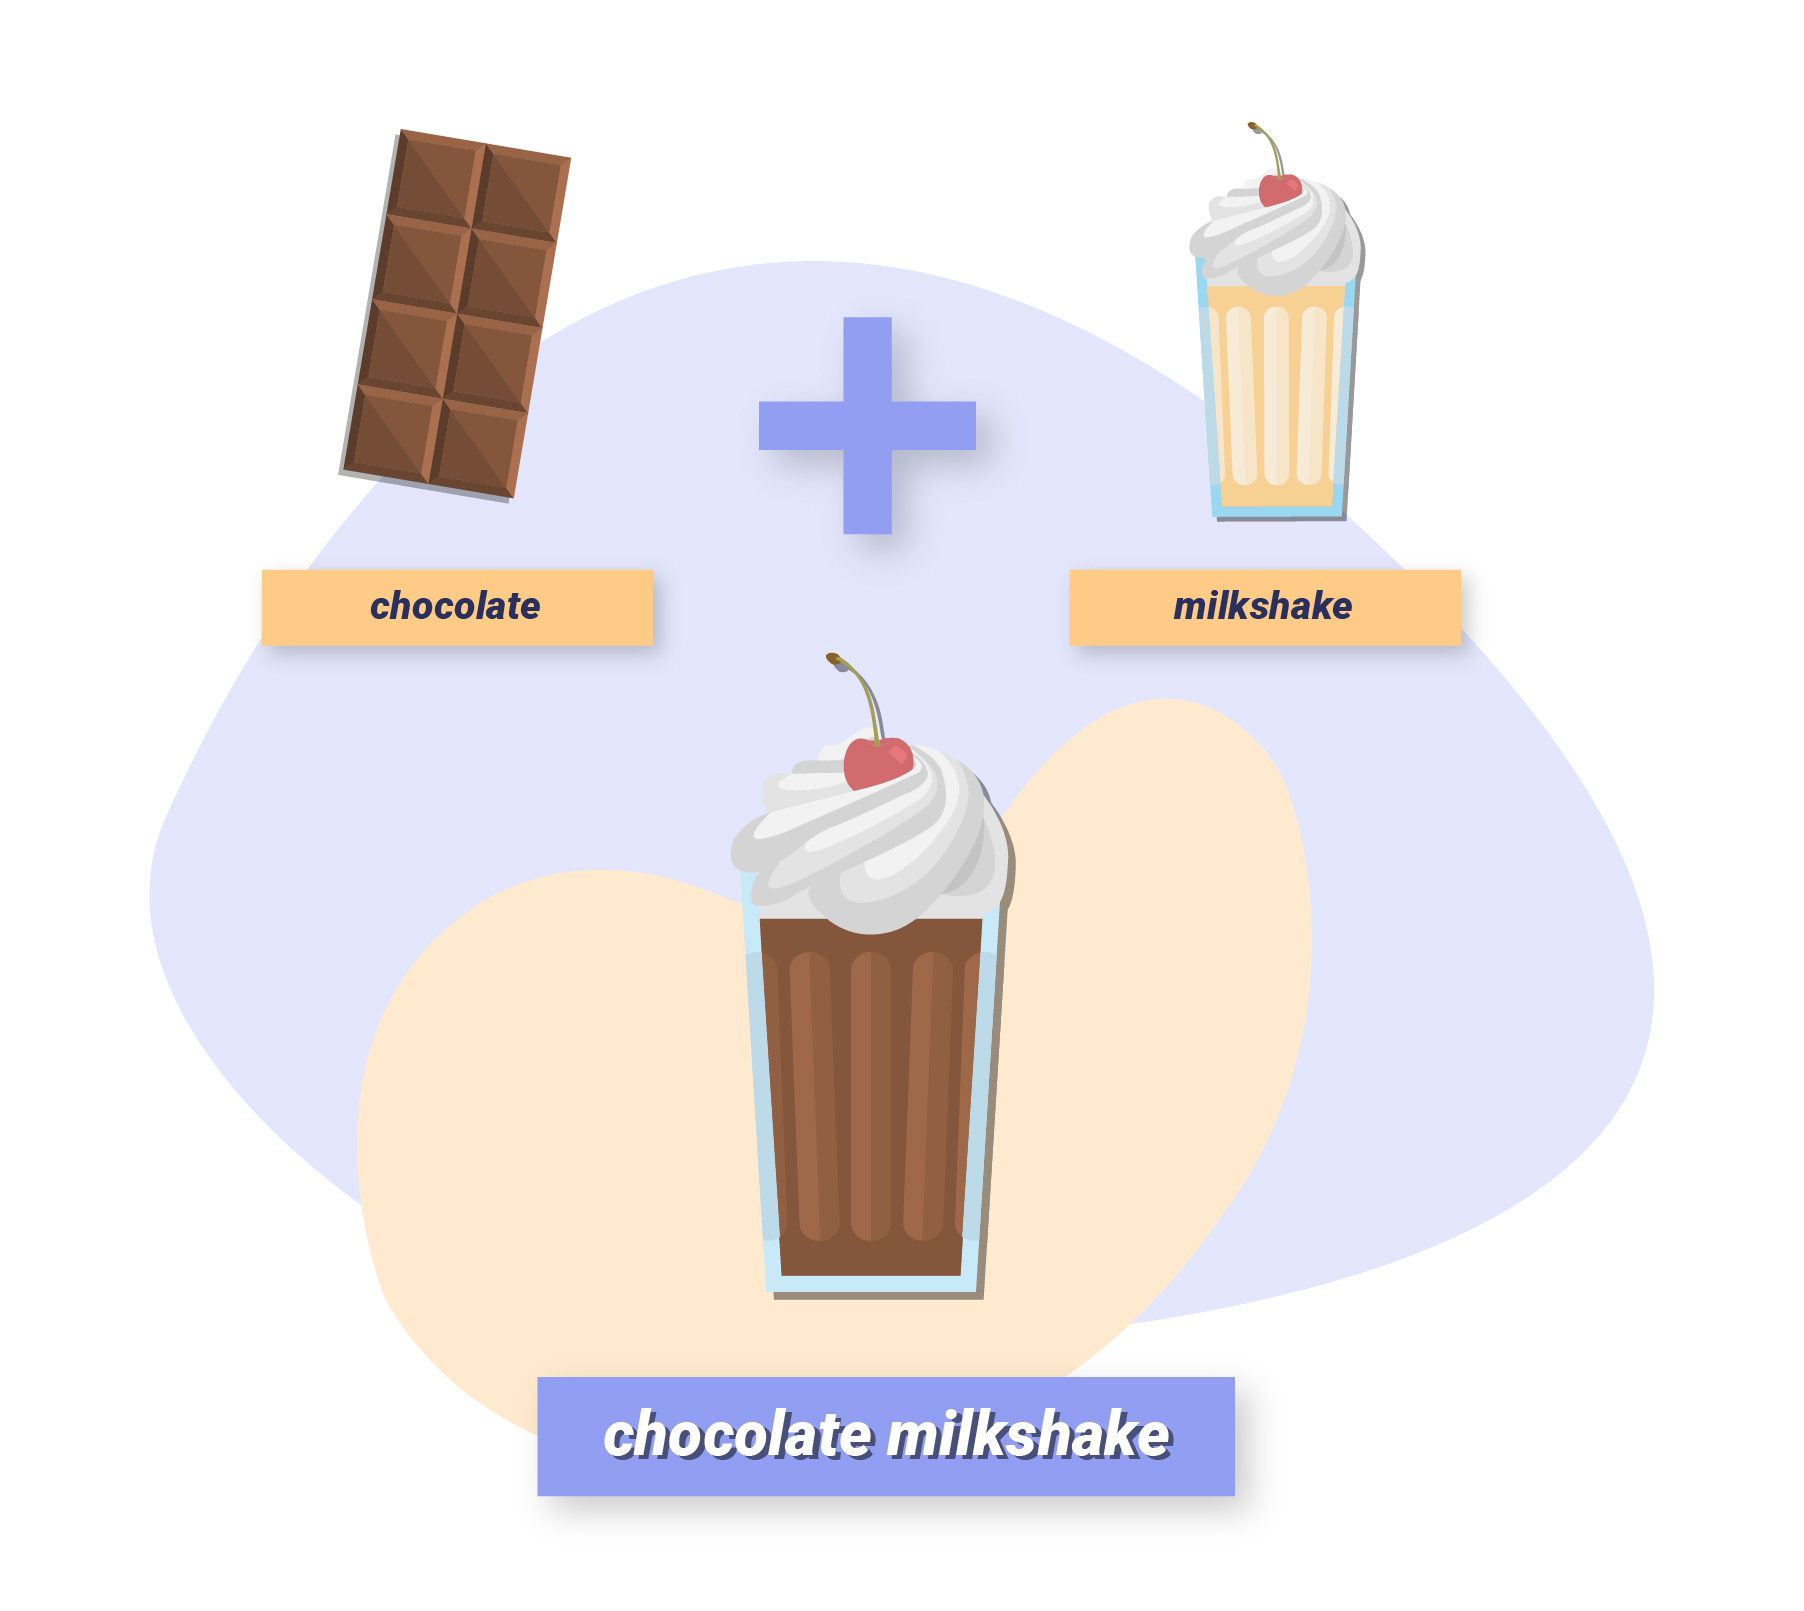
Solution: If two words appear frequently in the same context, they should be represented by two nearby vectors.
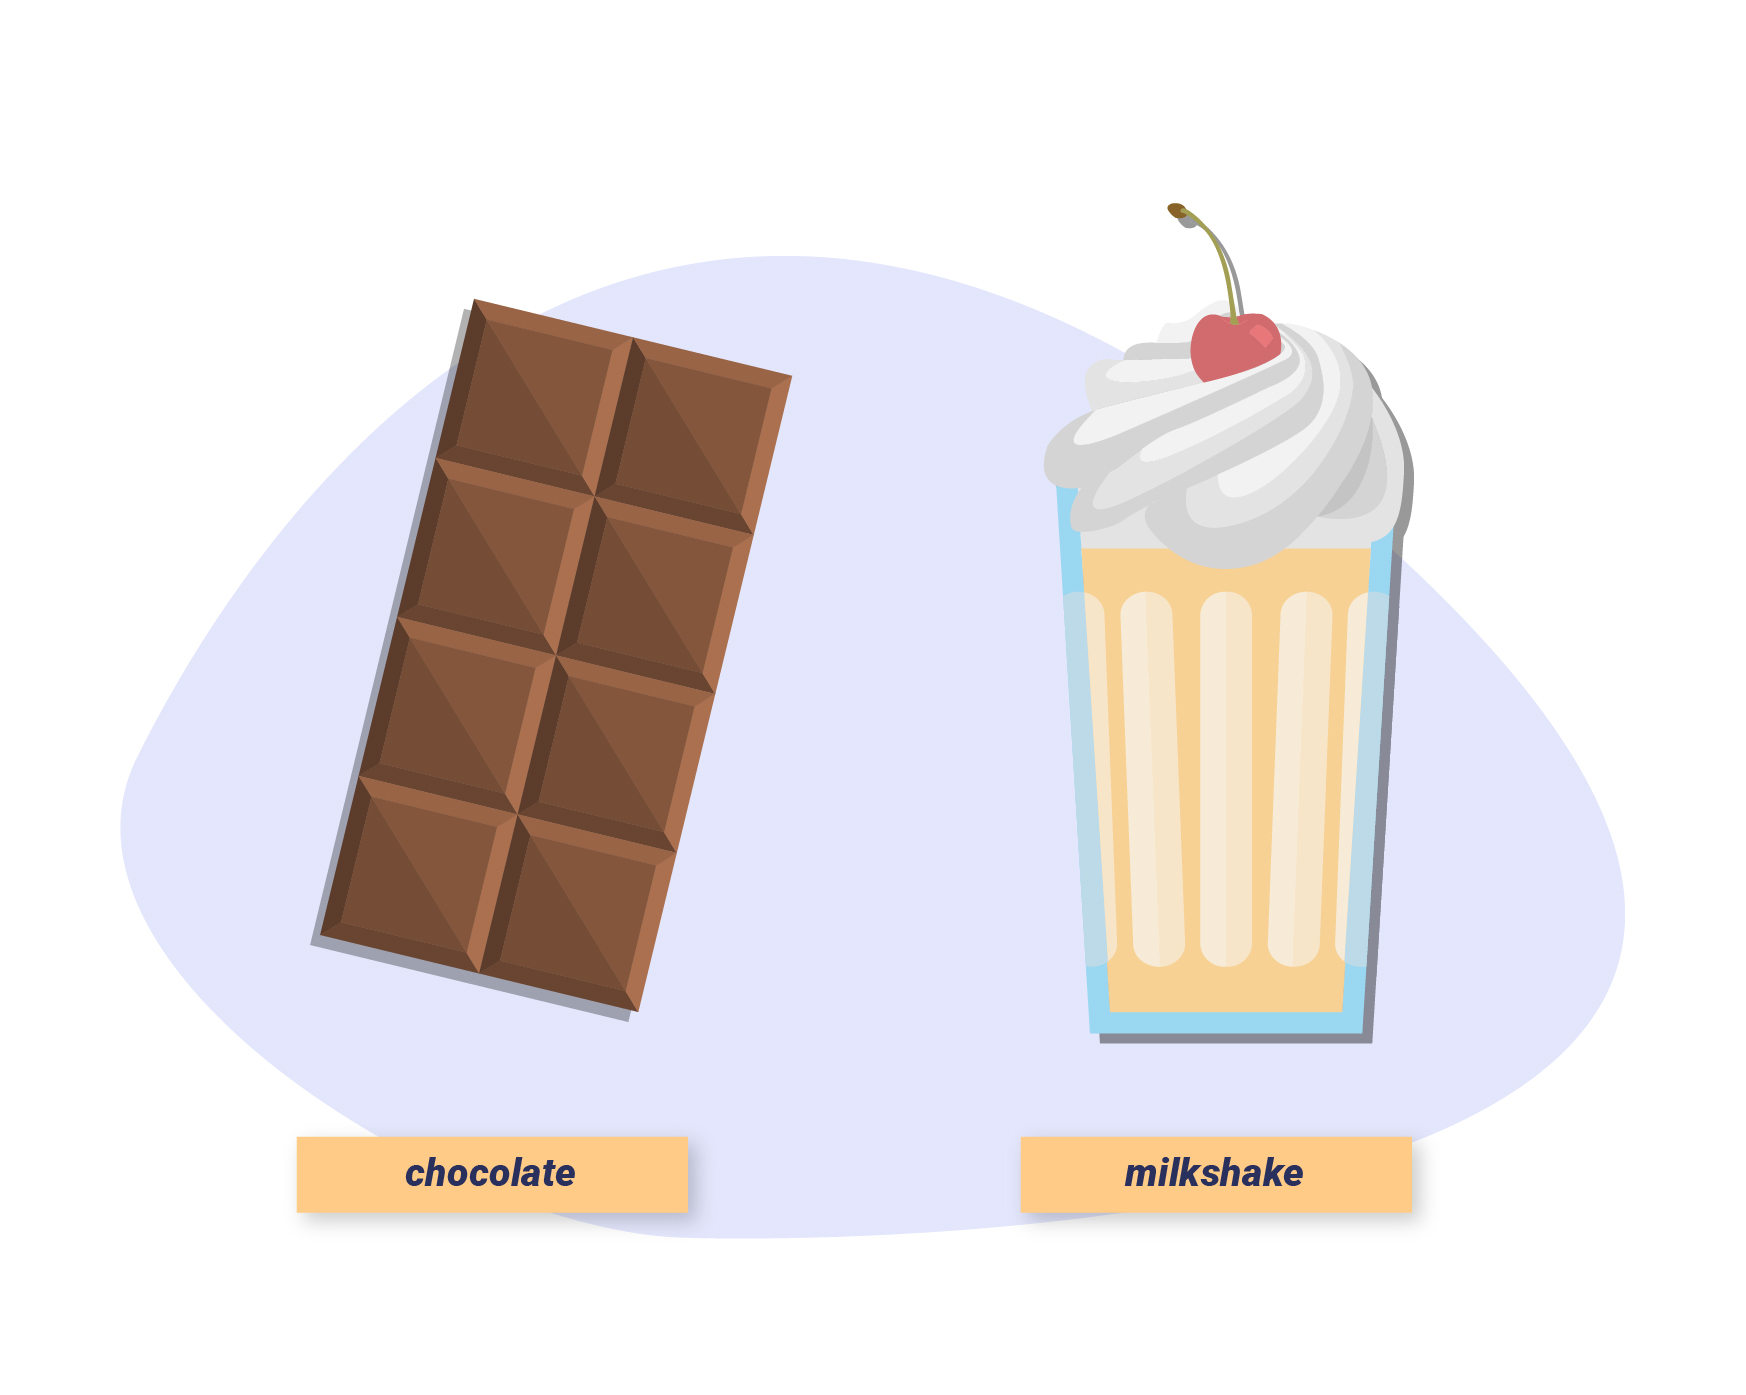
Let’s take the words “milkshake” and “chocolate” from our example above.
We can apply the operation to “add” the vectors for these terms together, to form the new phrase “chocolate milkshake”.
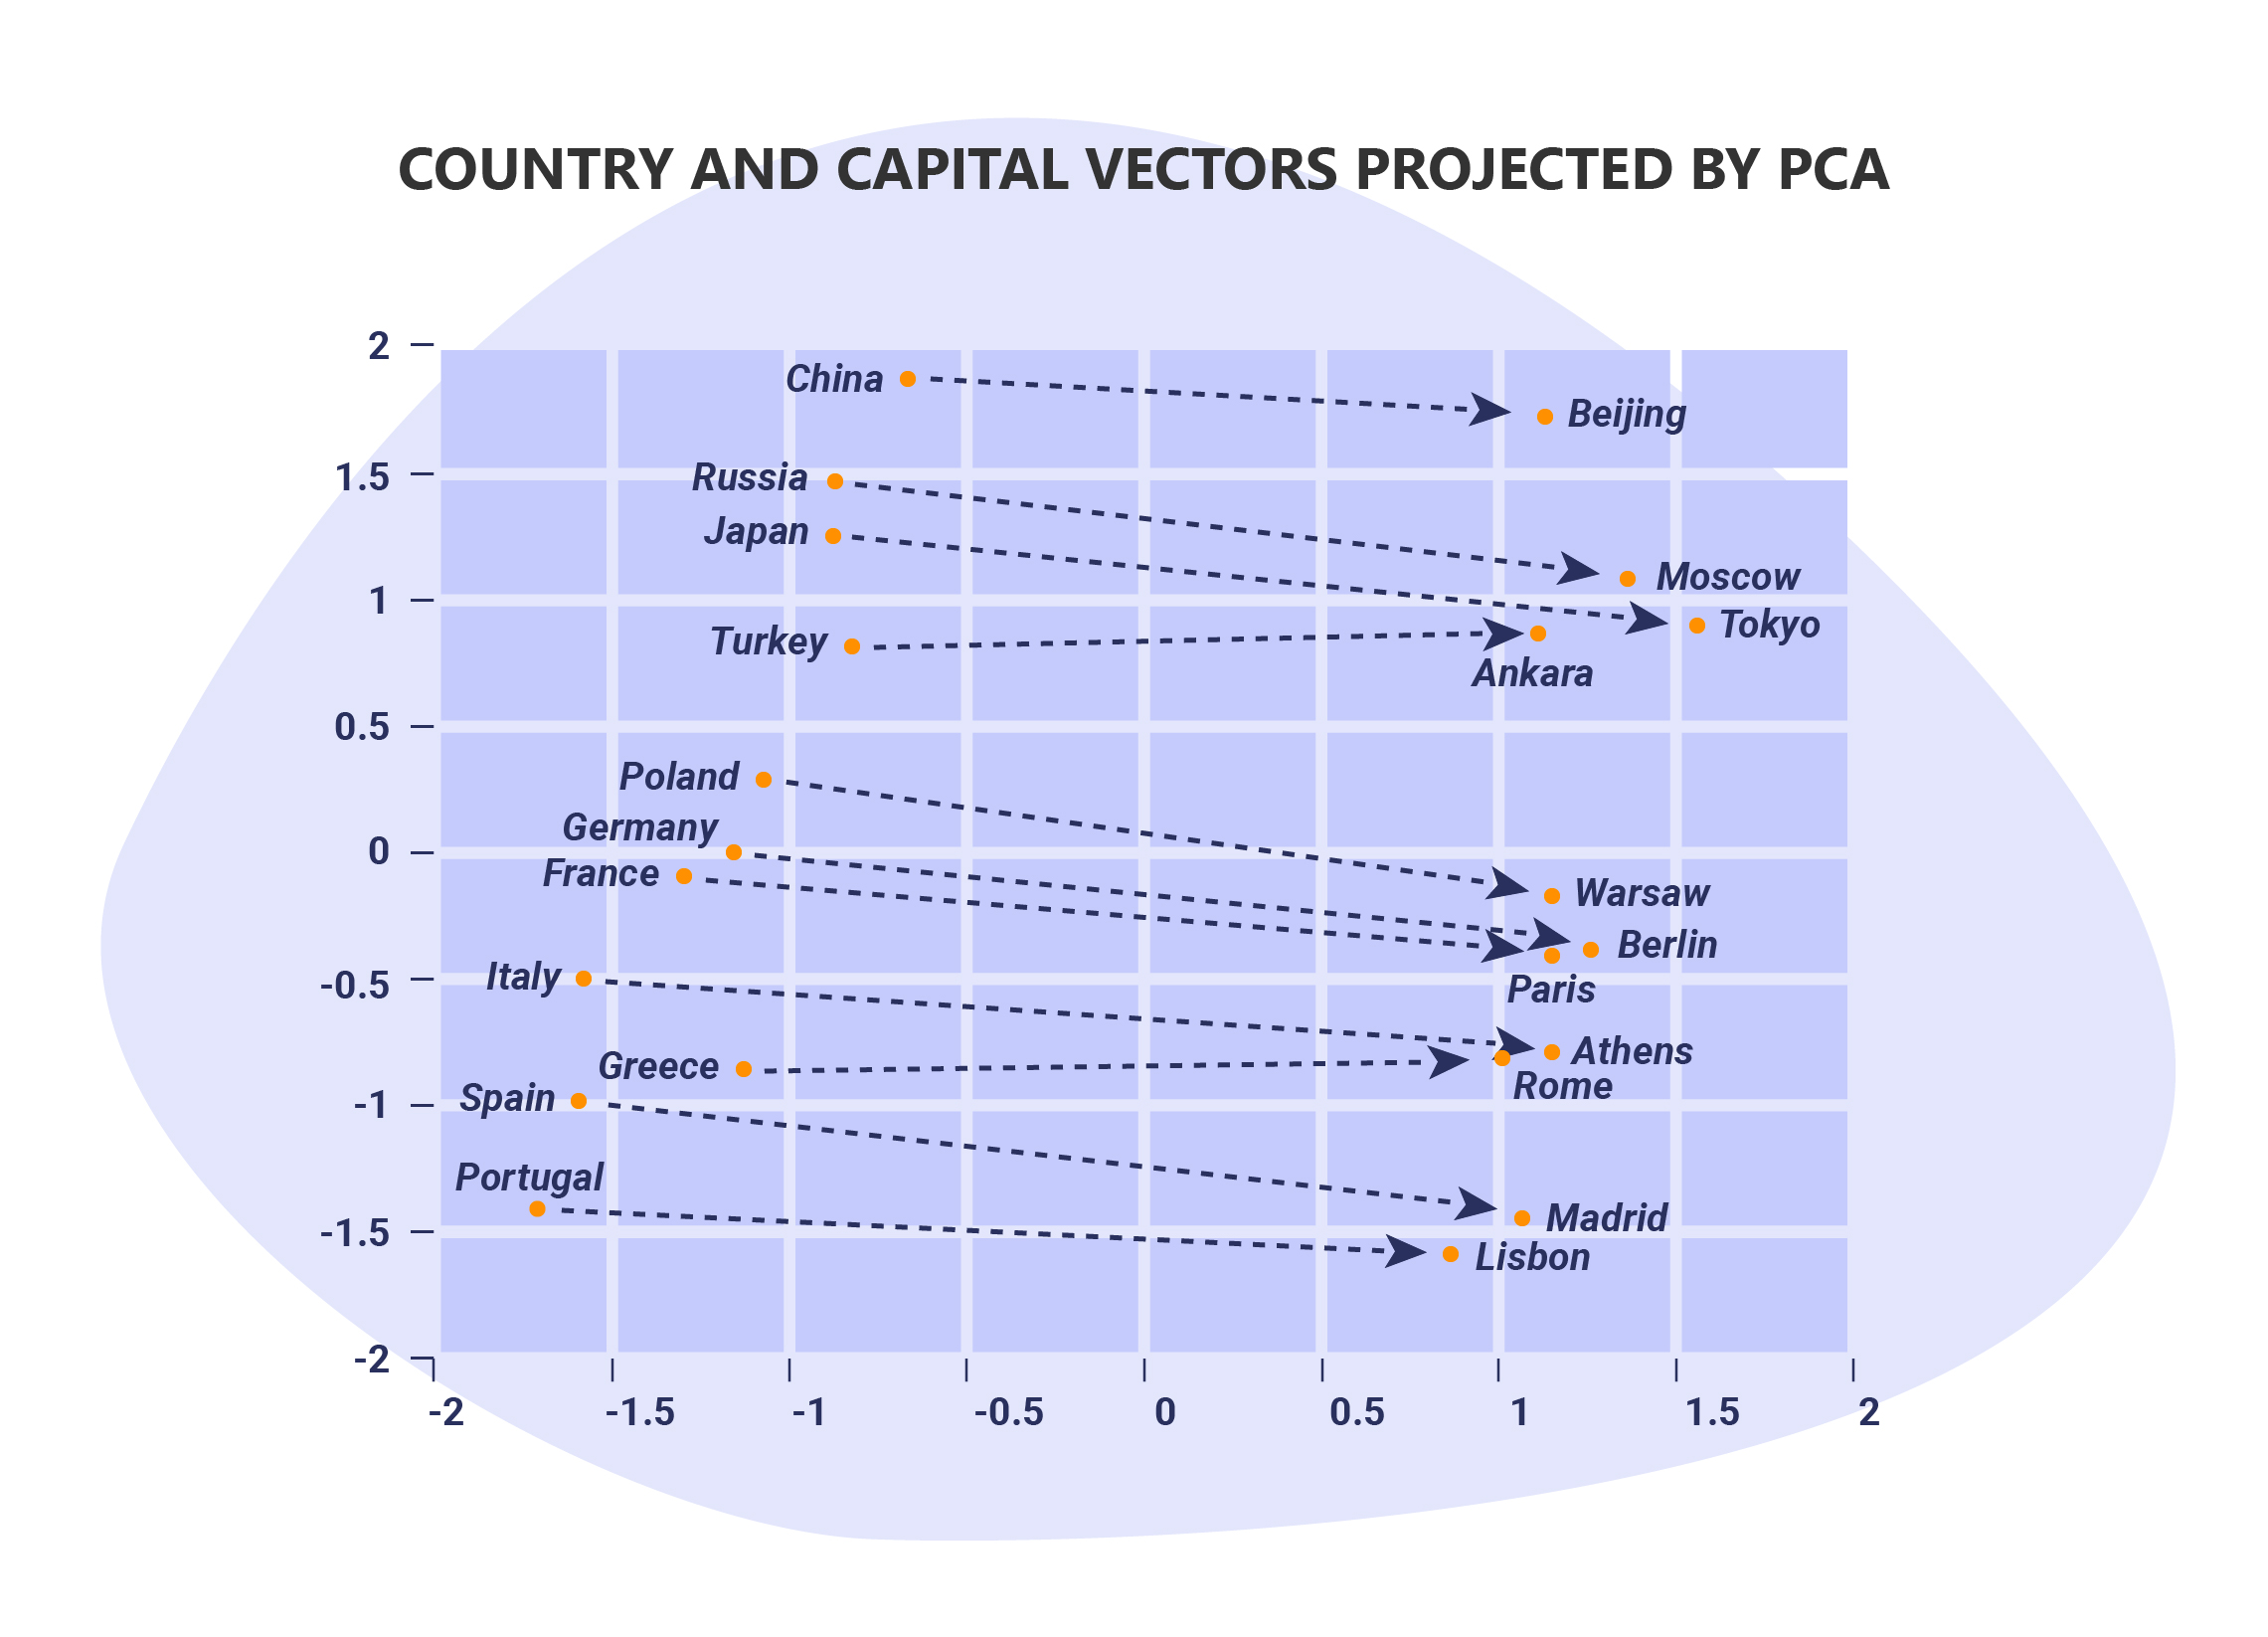
Google has offered an example of their own which illustrates the connection between capital cities and countries.
For instance, by reading lots of news articles, Word2Vec model is able to associate “Paris” with “France” and “Tokyo” with “Japan”, but is smart enough to know that “Beijing” and “Germany” are not related to each other.
Here’s where the tool gets powerful.
If you know the capital city of Russia is Moscow, but you wanted to find out what the capital city of Portugal is.
All you would need to do is; Moscow – Russia + Portugal which would return Lisbon.
In later sections, we’ll explore how Word2Vec impacts Google’s core algorithm and how it is used in Natural Language Processing.
Intelligent Resource Allocation
Google’s sophistication is constantly growing with more and more algorithms being introduced and used to decide which websites should be crawled, indexed and ultimately, ranked.
That being said, as powerful as these algorithms and Google are, there’s a limited amount of resources available in order to achieve this.
So Google needs to be smart with what they’re using these resources for – this is especially important for indexing (and crawling).
Alpha-Beta Pruning Algorithm
It should come as no surprise that in order to achieve this, Google makes use of yet another algorithm – the alpha-beta pruning algorithm.
A modified version of the minimax algorithm (which is a search algorithm predominantly used in the field of game theory), the alpha-beta pruning algorithm is an AI (artificial intelligence) technique that further reduces the computation time of a search.
As the name suggests, this is achieved through the process of pruning.
We won’t go into the specifics of alpha-beta pruning algorithm here as it’s beyond the scope of this course, instead, we’ll provide a simplified explanation of the core concepts and how they apply to Google’s search algorithms.
The video below wonderfully explains how the algorithm works in the context of game theory.
In essence, the pruning algorithm is designed to traverse a graph (in our case a network of websites connected via links), whilst keeping track of the best (or most valuable) pages that it has found using two values, the alpha and beta score which is derived from the minimax() function.
So, if the minimax() function is not showing enough value for a particular page or section to crawl/index/rank it, the algorithm would cut off (prune) the entire section because it may have found a better page already.
In other words, if you have sections of your website that contain low value pages, Google will likely ignore them. This in turn enables Google to focus on the more important sections of your website.
This insight into how Google’s gut works is vital as it helps us to intelligently optimise our websites.
Index Bloat
Googlebot indexes any resource that it can find on your website, including ones that offer little to no value to the user and shouldn’t be indexed – this is known as index bloat. This causes Google to spend unnecessary time crawling and indexing these pages, and as a result, is eating up precious crawl budgets.
A common case of index bloat occurs with eCommerce websites, where paginated or /tag/ pages are indexed by Google. These pages accidentally create issues like duplicate or thin content and offer no real value to the user’s experience.
As webmasters, we want to make it as easy as possible for Google to crawl the pages that are the most important, luckily, there are several ways to do this. But first, let’s take a look at the kinds of pages that cause index bloat.
Pages That Cause Index Bloat
- Session IDs – Whilst this is an uncommon case, sometimes session IDs (eg. PHPSESSID=24562f297a57a5a743894a0e6u8012e3) trail every URL you visit. Googlebot will likely be getting a unique session ID every time it crawls the site. Considering how many times Googlebot may visit an online store (that could have 100’s of collections and 1000’s of product pages), this could escalate into a serious case of index bloating if not dealt with correctly.
- Empty Categories – Category pages that have zero products are not only an indexing issue, but also impact the customer’s experience.
Here’s an example of a large eCommerce website (Smyths Toys) that has empty category pages that are indexed.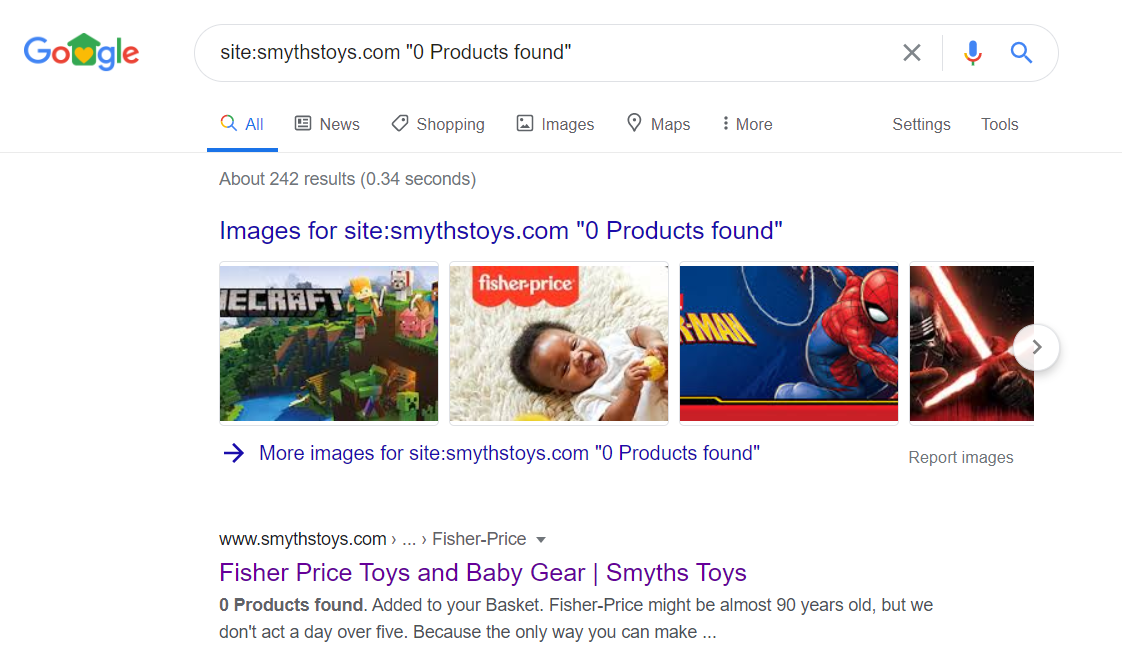 You can check for these kinds of pages by either crawling your website using a tool like ScreamingFrog, or using a quick Google site search:
site:yourdomain.com “0 products found”– this will return the pages that include the text “0 products found”.site:yourdomain.com inurl:category– this is a longer approach as it requires having to spot check the category pages that may or may not be empty. - Category Filters – The ability to filter categories on an online store is a great way to target specific keywords. However, they can potentially be detrimental to a decline in rankings in cases where only a few products are displayed to the customer, especially if no canonical tag is used.
 For example, clothes retailer Next has lots of category pages with very few products, the canonical tag is present in the source code which means that the fact that this page is indexed is not an issue.
 Use the following site search:
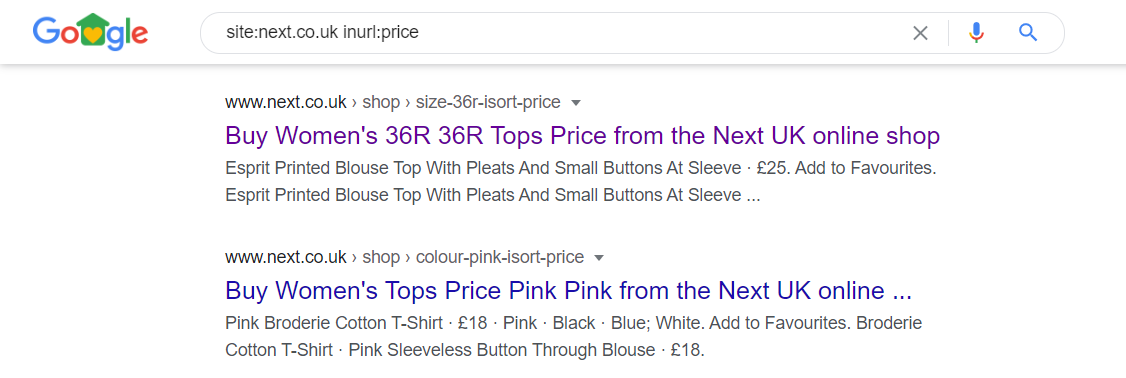
site:yourdomain.com inurl:category– again, this is a longer approach as it requires having to spot check the category pages that may or may not have a few products. - Sorting and Views – Most online stores enable you to sort products by name, price, date or popularity. You can also select the sort direction: ascending or descending. Apart from the order that the products are sorted, everything else stays the same. In other words, the category contains the same products, so indexing the sort parameters only uses up your crawl budget. A similar situation occurs when you change a product view in a category, for example, a list or grid.For example, Next has several pages that include parameters such as “size” and “price” within their URLs which create duplicate and thin content issues. For example:https://www.next.co.uk/shop/gender-women-productaffiliation-tops/size-36r-isort-price
 Use the following site searches to find pages containing sort/view parameters in the index:
site:yourdomain.com inurl:price– this returns URLs that contain “price” in the URL
site:yourdomain.com inurl:size– this returns URLs that contain “size” in the URL
site:yourdomain.com inurl:colour– this returns URLs that contain “colour” in the URLetc. - Pagination – Links to the first page of the pagination contain an additional parameter (eg. /category?page=1) creating an obvious duplication with the main category page. Here, pages with this exact parameter shouldn’t be indexed by Google and instead, should indicate which category page is being duplicated so that only the main page is indexed as opposed to the one with the ‘page=1’ parameter.For example, clothes retailer Zara has thousands of paginated pages in the index.
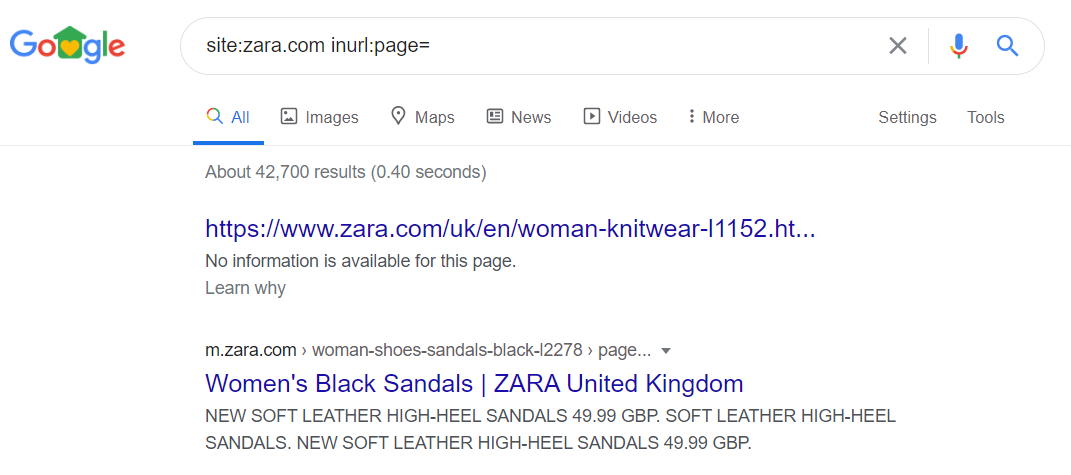 Use the following site search to find paginated pages that may be indexed:
site:yourdomain.com inurl:page– this returns URLs that contain “page” in the URL
site:yourdomain.com inurl:p=– this returns URLs that contain “p=” in the URLetc. - Tags – A common occurrence in both WordPress and eCommerce websites, tags can attract a lot of traffic if planned and structured correctly, but they also create a considerable amount of internal duplication.For example, culture magazine Variety (which uses WordPress) has almost 400 tag pages that are indexed.
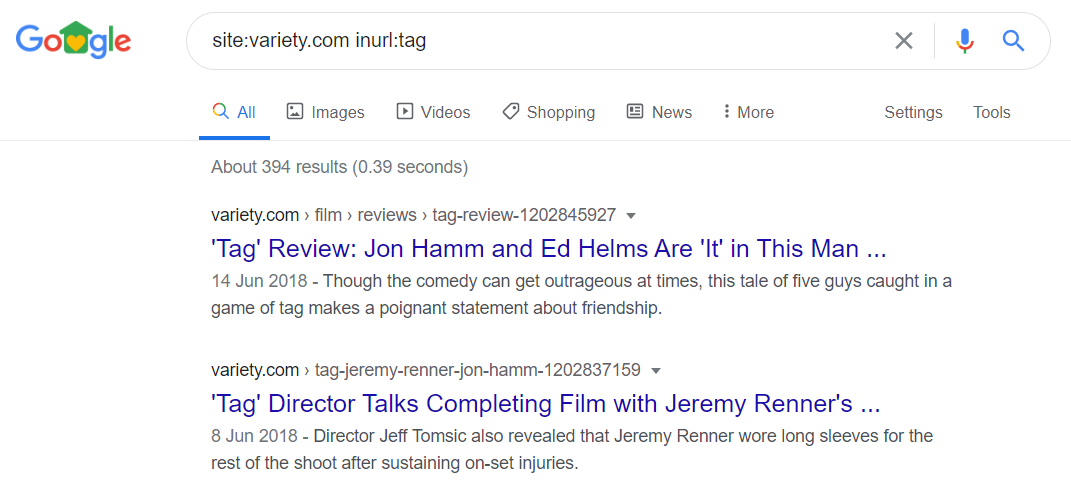 Use the following site searches to find tag pages that may indexed:
site:yourdomain.com inurl:tag– this returns URLs that contain “tag” in the URL
site:yourdomain.com inurl:/tag/– this returns URLs that contain “/tag/” in the URL - Forms – Any type of form that shoppers have easy access to should be blocked from the index. This includes login, user registration, newsletter forms, add a comment/opinion, etc.For example, the Next website has several log-in pages indexed.
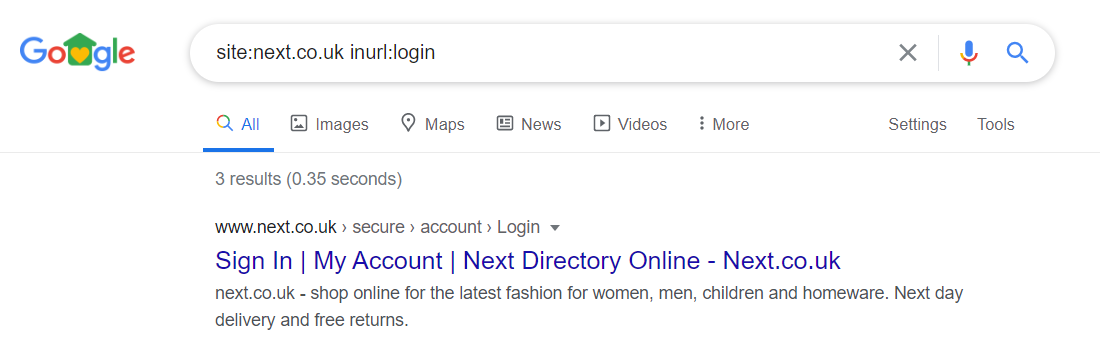 Use the following site searches to find pages like this in the index:
site:yourdomain.com inurl:register– this returns URLs that contain “register” in the URL
site:yourdomain.com inurl:login– this returns URLs that contain “login” in the URL
site:yourdomain.com inurl:form– this returns URLs that contain “form” in the URLetc. - Duplicated Text-Only pages – A common issue in most eCommerce sites is the number of pages that contain very similar or even identical text. These are duplicated pages like the T&C, policy pages that may be hosted internally or externally.
- HTTP Pages – If your website is using HTTPS, it is possible that the HTTP versions of your web pages are being indexed. These should be removed as they cause duplicate content issues.For example, Next has over 7,500 HTTP pages indexed.
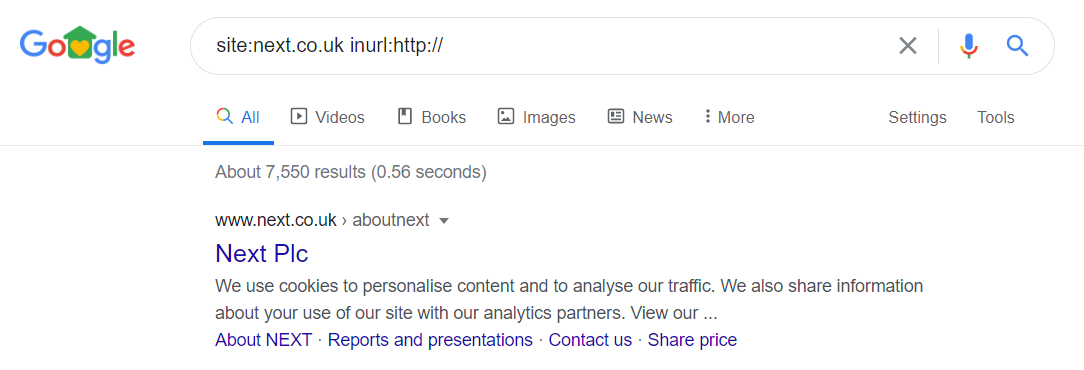 Use the following site searches to find HTTP pages that may be indexed:
site:yourdomain.com inurl:http://– this returns URLs that contain “http://” in the URL
site:yourdomain.com -inurl:https://– this returns URLs that do not contain “https://” in the URL
Index Management
There are several ways to prevent Google from indexing these unwanted pages.
- robots.txt file – A simple text file that should be available at your root domain (eg. http://www.google.com/robots.txt) including “Allow:” and “Disallow:” directives. We will discuss the robots.txt file in more detail in a later module.Below is an example of code blocking access to search engine results pages:
User-agent: *
Allow: /
Disallow: /search
Although robots.txt is a quick solution, it is quite imperative. For instance, pages that have already been indexed by Googlebot may not disappear after being blocked using this method.
This is because Google will be blocked from re-crawling them, which will result in the following sentence: “A description for this result is not available because of this site’s robots.txt” under that particular resource.
- Noindex Robots Meta Tag – The noindex meta tag prevents search engine bots from indexing a page, but it does allow them to be crawled. The meta tag goes to the head section of the page that is not intended to be indexed:
<meta name="robots" content="noindex">This is another simple solution, but requires Google to recrawl the page in order to see the “noindex” command. - Google Search Console – Google groups similar pages into clusters and makes a decision on which URL should appear in the SERPs to represent each cluster. However, in the case where this is not possible, the URL Parameters tool in Google Search Console can be used to tell Google how to handle these URLs.This solution is great for specific parameters that we don’t want indexed, but should be used with care as it could potentially result in de-indexing a significant portion of the website.
- 301 Redirects – Unwanted pages can be redirected to the desired address, so that Google will replace the address in its index. The ‘301 Moved Permanently’ HTTP header is recommended and the most SEO-friendly. Unnecessary redirects should be avoided; for instance, for an incorrect URL in a site’s main navigation, the link itself would need to be fixed as well.
- 404 Status Headers – We’ve all encountered a 404 Not Found error page – this is caused when a resource has been deleted and cannot be found on the web server. When Google encounters a 404 header, it will retry to crawl and index the page before returning this response and deleting it from the index. This gives you a chance to fix the resource before it disappears from the index.
- Canonical Tag – The canonical meta tag is used to tell Google about any known, duplicated pages, but importantly, to show where the original content is. Here’s an example of a canonical tag that is placed in the source code of http://example.com/copied page:
<link rel="canonical" href="https://example.com/original">The href attribute should point to the page where the original content exists. For example, if the default sorting direction is ascending and the URL has order=asc or order=desc query string parameters, then https://example.com/category?order=asc URL should include the canonical tag pointing to the main category page, as shown below:<link rel="canonical" href="https://example.com/category">
The Primary and Secondary Index
We’ve already established that Google stores all the information about the pages that it crawls in its gargantuan index. However, considering the amount of content and information that it needs to index, for both security and logistical reasons, it would not be wise for it to keep all these details in a single place.
In order to combat this issue, Google stores the indexed pages in two separate databases. One is the main index (which is what Google uses to rank), and the other is the supplementary index.
The supplementary index contains all of the other web pages that it has encountered, but has deemed not to be important or valuable for searches. These pages are recorded purely for reference purposes and may include pages that are duplicated, canonicalised, returning soft 404 errors etc.
With a simple site search, you can find pages that are in the supplementary index.
Let’s take a look at an example, using the site search: site:susodigital.com.
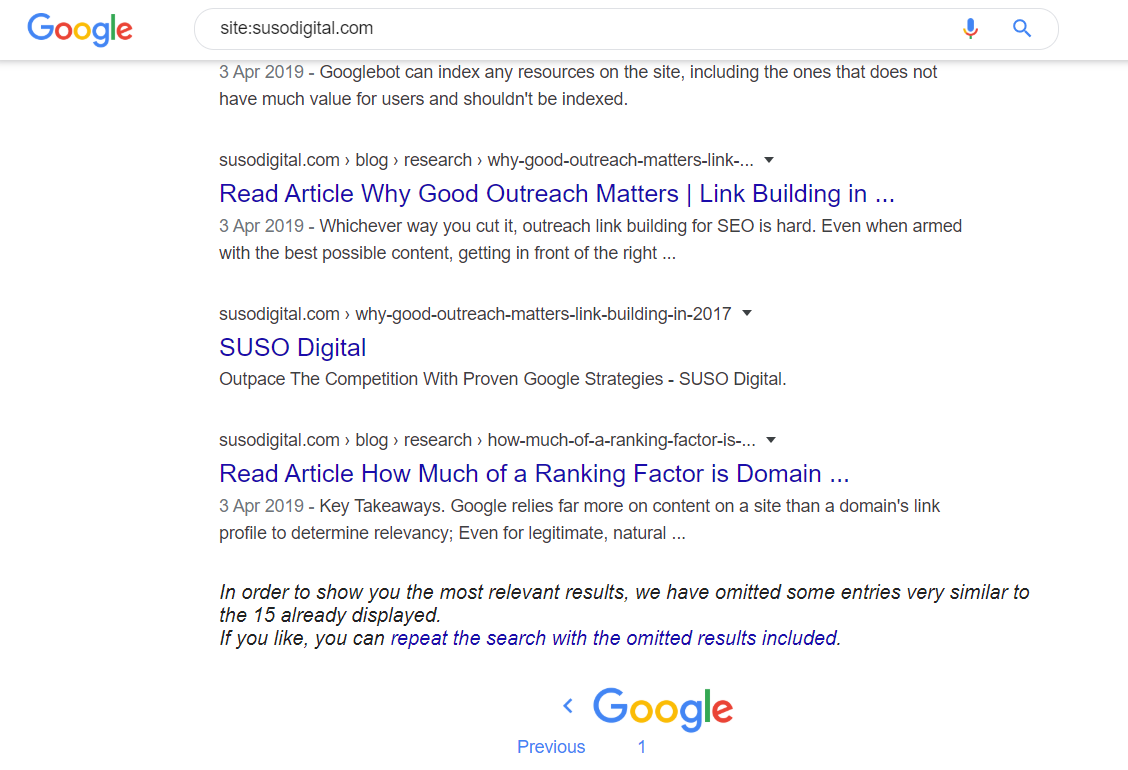
If we look at the bottom of the second page, we can see that Google displays the following text:
“In order to show you the most relevant results, we have omitted some entries very similar to the 15 already displayed. If you like, you can repeat the search with the omitted results included.”
The results that Google has omitted are saved in the supplementary index. Clicking the link will display pages that are in the main and supplementary index.
It goes without saying that you want as many of your pages to appear in Google’s main index as opposed to the secondary index – which is why issues like duplicate content, 404 pages, thin/low quality pages should be avoided.
In other words, you want your supplemental index ratio to be as low as possible.
To calculate your supplementary index ratio, you need to perform two simple site searches.
Let’s take a look at an example.
site:susodigital.com – returns the total number of pages indexed by Google.

site:susodigital.com -inallurl:susodigital.com – returns the total number of pages in Google’s main index.

From the above example, we can see that Google has omitted one page from its main index.
Therefore, the ratio for susodigital.com is 15:1
The best way to improve your supplementary index ratio is to ensure that you are:
- Creating quality content that will be beneficial to the end user
- Avoiding creating pages that contain duplicate content
- Avoiding creating pages that contain thin content
- Avoiding pages that return soft 404 errors
Google Indexing Stages
Depending on the implementation of a page, Google has varying methods of indexing it. For example, Google indexes JavaScript differently to HTML or CSS.
This is important for several reasons:
- Google saves resources by delaying more costly operations such as rendering CSS which is more costly than simply evaluating and indexing HTML content. Likewise, rendering JavaScript is more costly than rendering CSS.
- Breaking the indexing of a page into stages also helps to optimise certain elements that affect the pagespeed at various stages of the rendering process.
- Avoiding JavaScript to show, hide or even manage the main content and crucial UI (user interface) elements of a web page.
So, let’s take a look at how Google breaks down the indexing process by walking you through how it would approach the SUSO Digital website.
Stage 1: HTML
In the case of crawling and indexing traditional HTML websites, the process is extremely simple and straightforward, not to mention super quick.
Googlebot simply downloads the raw HTML file.
Stage 1.5: Images
Likewise, when it comes to images, Googlebot is able to simply download the metadata regarding the image such as the image alt text, but doesn’t index the image itself.
You can see how Google views the HTML code by typing: view-source:yourdomain.com
If the SUSO Digital website did not have any CSS or JS (or Googlebot was blocked from viewing the CSS and JS files, which is not recommended), this is how Google would view it.
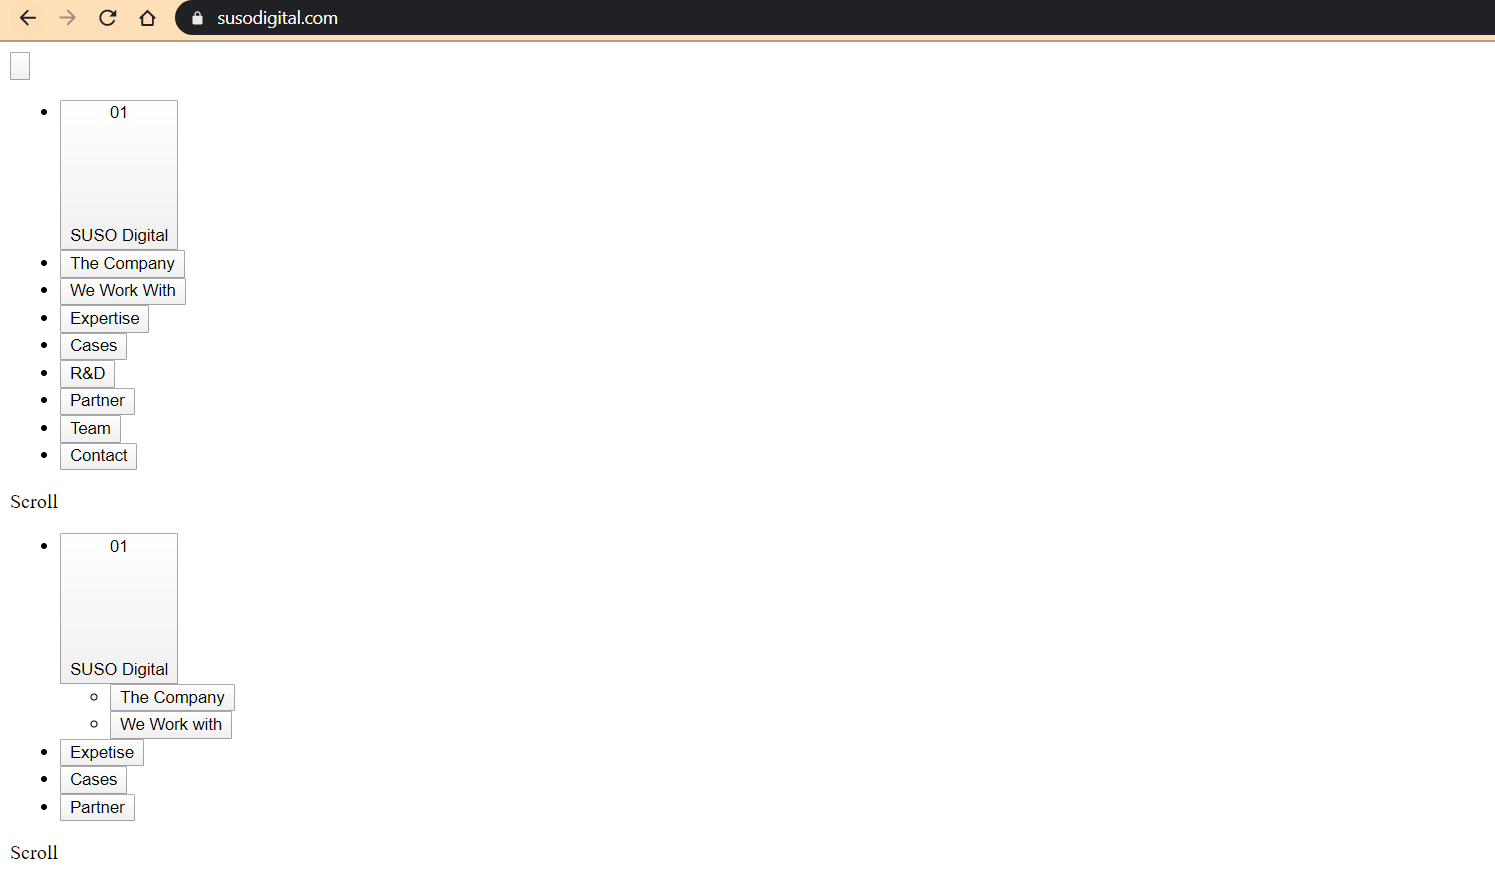
Stage 2: CSS Enabled
Google downloads and extracts any CSS files associated with the page. In terms of page speed, this refers to the first contentful paint and first meaningful paint of your page.
First Contentful Paint is a metrics that measures the time it takes from when the web page starts loading to when any part of the page’s content is rendered on the screen by the browser (or search engine).
First Meaningful Paint is a metric that measures the time it takes for the primary content on a page to become visible to the browser (or search engine).
This is what the SUSO Digital website would look like if CSS is enabled, and JS is disabled.

Stage 3: JavaScript Enabled
Googlebot downloads the JS files and uses the Google Web Rendering Service (which is a component of the Caffeine Index) to parse, compile and execute the JavaScript code. In terms of page performance, this is the stage where the time to interactive metric comes into play.
Time to interactive measures how long it takes a page to become interactive.
Stage 3.5: JavaScript Delayed
At this stage, Googlebot delays the execution of the rendering process by one to five seconds to see whether there are any differences on the page after the full initial loading of the page with JavaScript. This is essentially looking at the after interactive metric in regards to page speed and performance.
This is how the SUSO Digital site is rendered with both CSS and JS enabled.
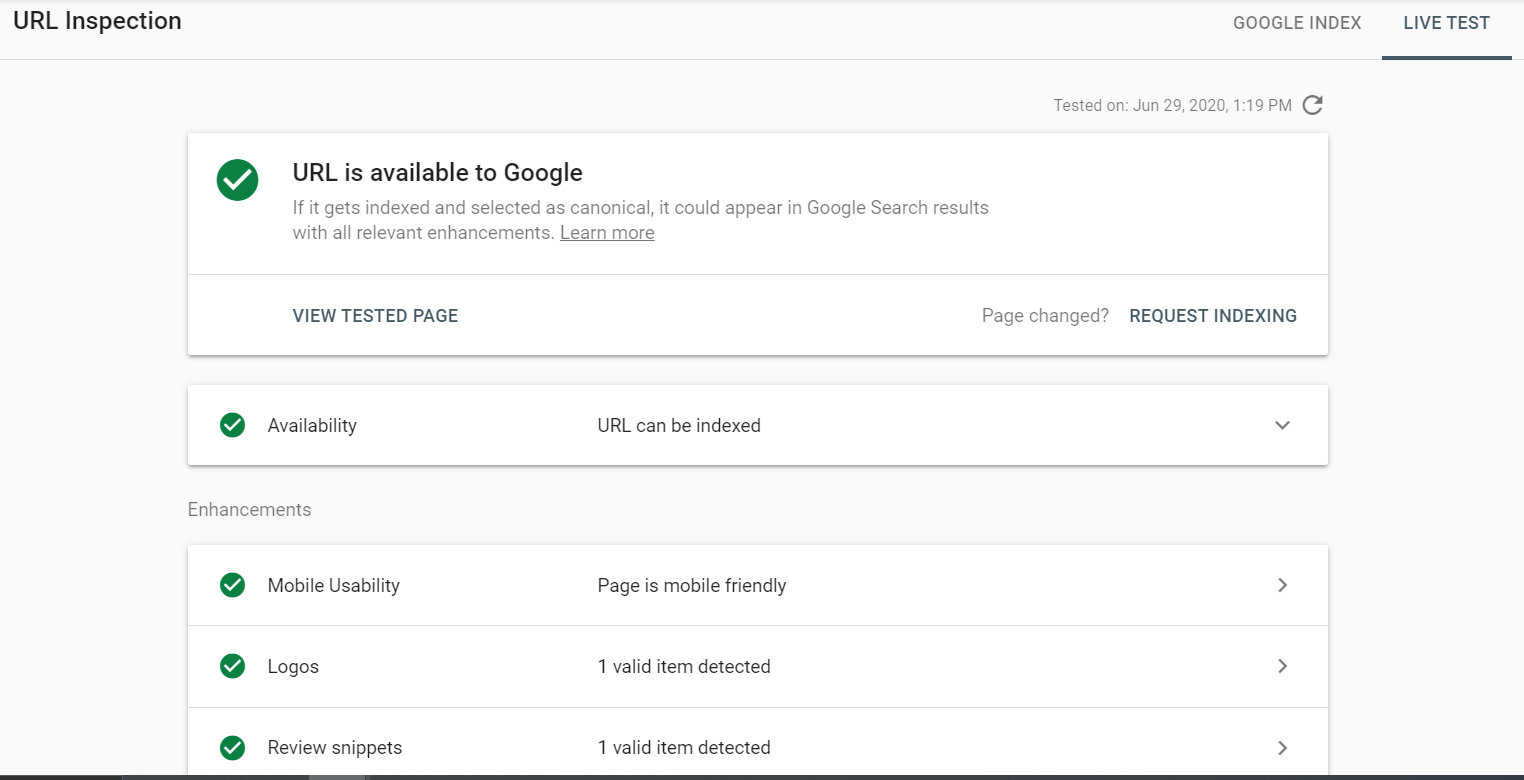
Note: to check if Google can fully render your web page, use the Live Test feature in Google’s URL Inspection Tool which is available through the Search Console. The tool allows you to see a visual representation of exactly how Googlebot renders the JavaScript on your page.
Here are some potential pitfalls that Google may encounter in its attempt to find your JavaScript code.
- Timeouts – ensure that you aren’t forcing Googlebot (and your users) to wait for a long time before they can view your content.
- Rendering Constraints – ensure that Google is able to access the JavaScript code using the URL Inspection tool on GSC.
- Skipping Files – Google may have decided to skip some of the resources for whatever reason i.e. it may have decided that quality of the content is low.
- Delays – As mentioned above, there may be a delay between Google being able to render the full page. Sometimes, there can be a delay of a few days (and even up to a week) between the initial crawl and full rendering of a web page.
- Not Found – in some cases, it may be that Google simply couldn’t find the JS files, in which case ensure that the files aren’t blocked by the sitemap or robots.txt.
Stage 4: Indexing
Once the HTML, images, CSS and JS files have all been crawled and sent to Caffeine, the page is indexed.